Guide: Setting Up TideCloak Audit Trail
This guide will walk you through the process of setting up and managing an audit trail in TideCloak to monitor actions within your identity and access management system.
Prerequisites
Before you begin, ensure that you have:
- Access to a TideCloak admin account.
- The latest version of TideCloak installed.
- Basic understanding of TideCloak events and logs.
- Admin console access to configure event listeners and audits.
1. Enable Admin Events
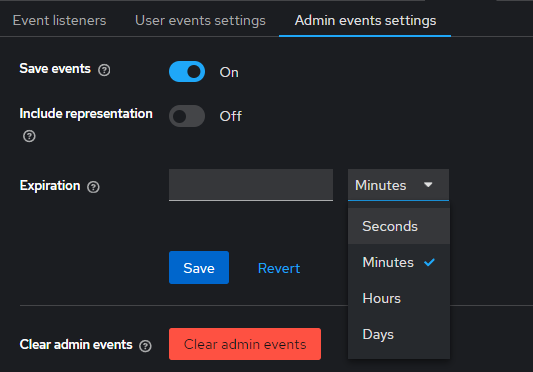
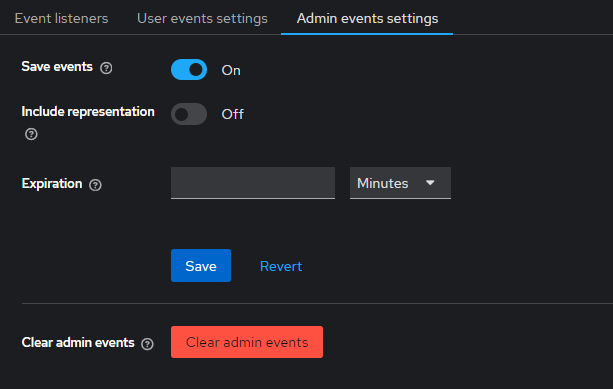
First, enable admin events within TideCloak to capture key admin operations. Access the TideCloak admin console and navigate to Realm settings > Events > Admin events settings .
Optionally, you can toggle Include Representation to ON . This switch includes JSON documents sent through the admin REST API, allowing you to view the details of actions taken by administrators.
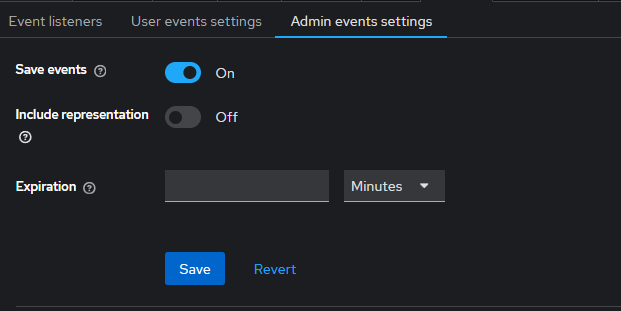
Ensure the Save events option is enabled. This will start recording actions like client and user creation, updates, and deletions.
2. Enable Users Events
In addition to enabling admin events, you can also enable user events to capture detailed logs of user actions. To do this, go to the TideCloak admin console and navigate to Realm settings > Events > User events settings . This allows you to track and monitor important user activities within the system.
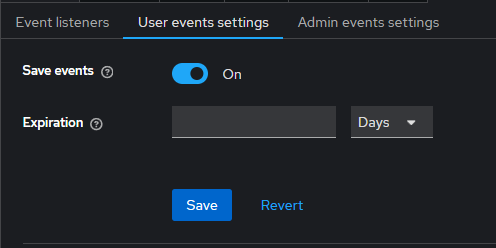
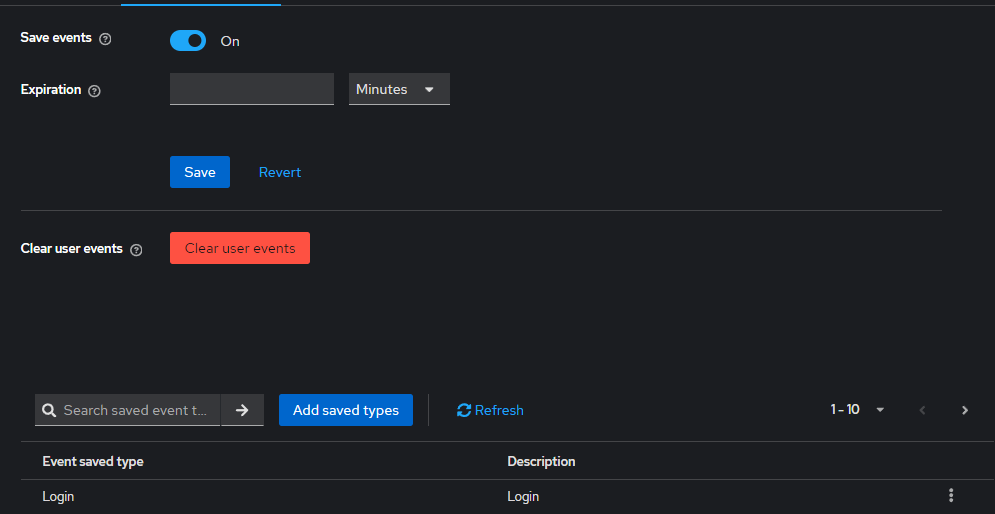
Ensure the Save events option is enabled for user events. This will start recording actions such as user creation, updates, deletions, and other key activities related to user management within the system.
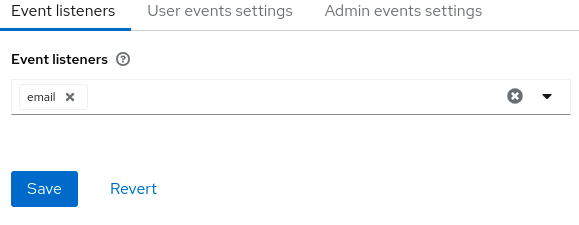
3. Enable Event Listeners
In the same Events configuration screen, enable Event Listeners . These listeners are responsible for capturing and responding to events. The default listeners include:

- jboss-logging : Logs events to the TideCloak server logs. When enabled, this listener writes event data, including errors, to a log file. For example, a failed login attempt (LOGIN_ERROR) will be logged with details like the user's IP address, authentication method, and error type. This log can be used for monitoring suspicious activity, such as potential hacker bot attacks. You can parse these logs for specific error events, extract the IP addresses of failed logins, and send them to intrusion prevention tools for enhanced security. By default, the logs do not include debug events, but you can modify the log level for more detailed tracking.
11:36:09,965 WARN  [org.keycloak.events] (default task-51) type=LOGIN_ERROR, realmId=master,
clientId=myapp, userId=19aeb848-96fc-44f6-b0a3-59a17570d374, ipAddress=127.0.0.1,
error=invalid_user_credentials, auth_method=openid-connect, auth_type=code,
redirect_uri=http://localhost:8180/myapp,
code_id=b669da14-cdbb-41d0-b055-0810a0334607, username=admin
- email : Sends event notifications via email, enabling you to stay informed about key activities or issues like login errors or changes to user accounts.
- others : Custom event listeners can be added as needed to handle specific actions or workflows.
You can further configure the logging level for jboss-logging to include success or error events by adding the following to the startup command:
bin/kc.[sh|bat] start --spi-events-listener-jboss-logging-success-level=info --spi-events-listener-jboss-logging-error-level=error
You can exclude specific events from being captured by certain listeners using arguments. For instance, to exclude events like UPDATE_TOTP or REMOVE_TOTP from being sent via the email listener, use the following argument during startup:
kc.[sh|bat] start --spi-events-listener-email-exclude-events=UPDATE_TOTP,REMOVE_TOTP
This ensures that only the relevant events are captured or acted upon by the listener, giving you more control over which activities trigger notifications or logging.
4. Configure Event Expiration
You can configure event expiration to prevent the audit logs from consuming excessive storage. Set the expiration time under Realm settings > Events > Admin events settings. , where you can specify how long TideCloak should retain events before they are automatically removed.The expiration timer can be configured in seconds, minutes, hours, or days depending on your system's requirements.
5. Enable Login Events
To track user login and logout activities, enable Login Events in the same Realm settings > Events > Admin events settings. section. This will capture detailed user session information.
6. View Audit Logs
Navigate to Events > Admin Events or Events > User Events to view logs of admin actions and user activities.

You can filter by date, user, or event type to narrow down specific actions. This provides a detailed view of what has occurred within the system.
7. Clearing User or Admin Logs
In addition to configuring event tracking, you have the option to clear logs for both user and admin events. To do this:
Navigate to Realm settings > Events > User events settings or Admin events settings .
In either section, you'll find the Clear user events or Clear admin events button.

Click the corresponding button to clear the logged events for that category.
This is useful when you want to reset or remove logs after a specific period or after resolving any issues that were captured in the audit trail.
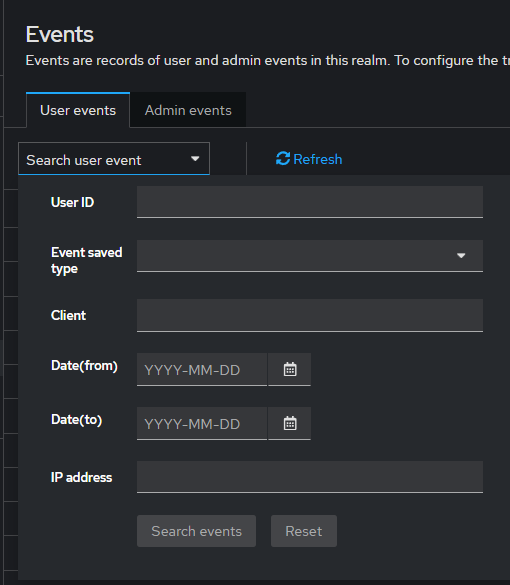
8. Search and Filter Audit Events
TideCloak provides a robust interface to search and filter audit events. Navigate to Events > User Events or Events > Admin Events in the TideCloak admin console.
You can search events using various filters:
- User ID : Filter events by specific user actions.
- Event Type : Choose from login, logout, or other relevant event types.
- Client : Filter events based on the client involved in the action.
- Date Range : Specify a start and end date to filter events for a particular period.
- IP Address : Track events based on the originating IP address.
Once you've set the required filters, click Search events to view the filtered results. Click Reset to clear all filters.
9. Setting Up Alerts for Critical Events
The Email Event Listener sends a message to the user's email address when an event occurs and supports the following events:
- Login Error.
- Update Password.
- Update Time-based One-time Password (TOTP).
- Remove One-time Password (OTP).
The following conditions need to be met for an email to be sent:
- User has an email address.
- User's email address is marked as verified.
- Navigate to Realm Settings > Events
- Click the Event listeners field
- Select
email.
10. Test the Audit Trail
After configuring your event listeners and logging, perform actions such as user creation or login. Then, review the event logs to ensure that the audit trail captures these events as expected.
11. Best Practices for Audit Trail Security
To further enhance the security of your audit trail in TideCloak, consider the following best practices:
Secure Event Storage
Ensure that all audit logs are stored in a secure location, ideally in a dedicated logging system with restricted access. Logs should be protected against unauthorized access or tampering by applying encryption or access control measures.
Regularly Review Logs
Establish a routine to review audit logs on a regular basis. This allows for early detection of unusual activities or potential security incidents. Set up alerts for high-risk events, such as failed login attempts, unauthorized changes to client configurations, or user privilege escalations.
Implement Retention Policies
Define clear retention policies to specify how long audit logs should be kept. Avoid keeping logs for an unnecessarily long period, but also ensure that they are available for a sufficient amount of time for auditing and investigation purposes.
Protect Against Log Tampering
Enable logging mechanisms that detect and prevent any attempts to tamper with audit logs. Consider implementing hashing or digital signatures for logs, which can help verify their integrity over time.
Centralized Log Management
For organizations with large-scale deployments, consider setting up a centralized logging system to manage and analyze logs from multiple TideCloak instances. This ensures consistent logging practices across all systems and simplifies monitoring.